[RPi] Pico & ESP-01 연결 도전
2024.06.16
집에 RPi Pico가 있는 것을 기억.
IO spec 보니 3.3V, HW uart 2개 이다.
Arduino IDE에서 사용가능한지 확인
https://blog.naver.com/cimygy/222559519256
Raspberry pi Pico #2(Arduino IDE 환경)
이전 번에 Raspberry pi pico용 Arduino IDE 보드툴을 설치해 보았습니다. Arduino Mbed OD RP2...
blog.naver.com
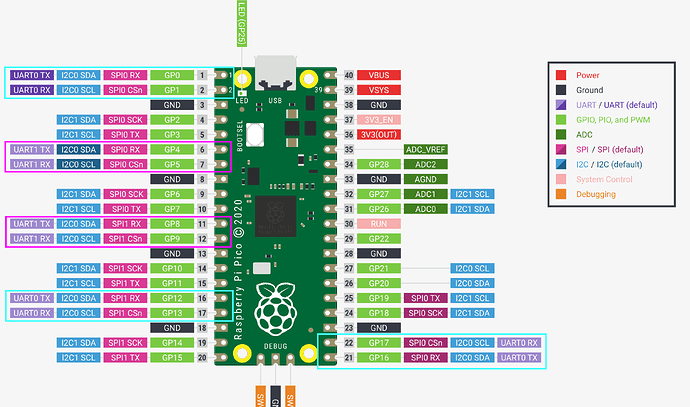
RP2040에 USB가 직접 붙는다. Serial -> USB Serial
UART0,1 를 지정할 수 있는 위치가 여러 곳이다.
Serial <-> Serial1으로 코딩하고 ESP-01을 연결했는데 터미널에 아무런 반응이 없다.
여러번에 도전끝에 일단 loop back으로 시도
void setup() {
  // initialize both serial ports:
  Serial.begin(115200);
//  Serial1.begin(115200);
//  Serial2.begin(115200);
  while (!Serial)
  ; // Serial is via USB; wait for enumeration
  Serial.println("Lets start");
//    LED_STAT = 0;
    pinMode(LED_BUILTIN, OUTPUT);
}

void loop() {
  if (Serial.available()) {
    int inByte = Serial.read();
     Serial.print("Re: ");
     Serial.write(inByte);
  }
    digitalWrite(LED_BUILTIN, HIGH);   // turn the LED on (HIGH is the voltage lev
    delay(500);
    digitalWrite(LED_BUILTIN, LOW);    // turn the LED off by making the voltage LOW
   delay(500);
}
루프백은 된다.
* While(!Serial) 을 하면 터미널이나 모니터에 연결되어야 다음 테스크가 진행된다.
업로드 할때는 BOOTSEL을 누르고 USB에 연결
GP0,1 (Pin 1,2: TX,RX)를 서로 연결하고 Serial<->Serial1 루프백 테스트에서 성공
void loop() {
//  // read from port 1, send to port 0:
  if (Serial1.available()) {
    int inByte = Serial1.read();
    Serial.write(inByte);
  }

//  // read from port 0, send to port 1:
  if (Serial.available()) {
    int inByte = Serial.read();
    Serial1.write(inByte);
  LED_STAT=!LED_STAT;
  }
  digitalWrite(LED_BUILTIN, LED_STAT);
}
Serial1에 다시 ESP-01 연결.
AT -> OK 받음 !!
아두이노(Arduino) 인터넷 하기 - Wifi (ESP-01: ESP8266)연결하는 방법
아두이노(Arduino)로 인터넷을 연결하는 방법은 랜선(LAN)을 연결하는 방법인 이더넷 모듈(Ethernet module)을 사용하는 방법, Wifi를 연결하는 방법, 3G/LTE를 연결하는 방법이 있습니다. 지난 포스팅까지
it-g-house.tistory.com
| AT+CWMODE | 1:Client 2:AP 3:Both |
| AT+CWLAP | WiFi 검색, List AP? |
| AT+CWJAP="SSID","PASSWORD" | 접속, Join AP? |
| AT+RST | Reset |
| AT+CWQAP | Quit AP? |
| AT+CWJAP? | ? -> 재확인 |
| AT+CIFSR | 주소확인 |